
So you got all your parts together, nice trucks some quality bearings, spacers, a rad deck, wheels and maybe a set of bushings. It’s really easy to assemble a skateboard, except for grip tape which is a bit more challenging the first time.
Have all your skateboard parts and tools ready. Apply the grip tape to your skateboard deck, puncture the holes and add the bolts. Attach your riser pads, trucks and attach the nuts. Put your bearings in your wheels, attach the wheels and you’re done. It shouldn’t take longer than 30 minutes, less so if you use a skate tool.
Here’s a checklist before you start assembling your skateboard.
- A skateboard deck
- Skateboard grip tape
- A pair of trucks
- 4 wheels
- 2 riser pads (optional)
- 8 bearings
- 4 spacers
- 8 bolts to attach your trucks
- Optionally, a set of bushings to your liking
- A skate tool or a 1/8″ Allen wrench, 9/16″ + 1/2″ + 3/8″ socket/wrench
- Screwdriver or any blunt object
- A razor blade or utility knife


Contents
Time to Build Your Skateboard
So you got all the skateboard parts? Good, let’s get to business! Assembling a skateboard is really easy and fun. Now get your tools ready. If you have a skate tool available this should be fairly easy. If you don’t have one make sure you get the following tools:
- Philips screwdriver or 1/8″ Allen Wrench depending on which type of bolt you have.
- 9/16″ socket/wrench, 1/2″ socket/wrench, and 3/8″ socket/wrench.
- 7/8″ Allen wrench, 1/8″ Allen wrench.
- A razor blade or plastic utility knife.
Step 1 – Apply the Grip Tape
Applying the grip tape is challenging the first time but you can pull it off. It really isn’t that difficult.
- Remove the sheet from the tape. Start at one end, align it, then press the tape from back to front. Use a finger to guide and keep it angled.
- Use a blunt object, like a screwdriver, to outline the board’s edge firmly.
- Make a small cut with a razor or utility knife. Angle the knife towards the deck and cut towards yourself for a smooth edge.
- Sand down the grip tape edges with leftover grip tape to prevent peeling.
- Mark and puncture holes for bolts. Push through from the grip side with a screwdriver to ease bolt attachment later.


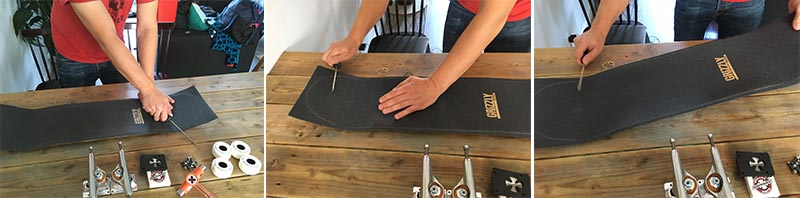


Keep the blade at an angle to prevent cutting into the sidewalls of a deck
If air bubbles form, lift and reapply. Due to the deck’s concave shape, air pockets might appear. If large pockets form, puncture and smooth them out.
Step 2 – Insert the Bolts
Now it’s time to punch the screws through the holes you made. If you haven’t punctured the holes yet, now it’s the time to do so. Puncture from the bottom of the deck and twist.


Step 3 – Attach the Trucks
Make sure the kingpin is facing inward or you’re going to have a really awkward ride.
A Tools you need:
- A skate tool or a 1/2″ socket/wrench
- Alan wrench or Philips screwdriver.
- Place your trucks on the bolts
- Hold the nut one side and on using a screwdriver or Allen wrench (depending on the type of bolts) to lock the bolt on the other side.
- Use your thumb and index finger and screw the bolts using your fingers.
- The screws are still loose so grab your screwdriver/Allen wrench and lock the bolt on the grip side.
- Use your skate tool and start turning the nut. If you use 1/2″ socket wrench lock the nut and turn the screwdriver.
- Make sure the baseplate can’t move anymore.


Step 4 – Put Bearings & Spacers in Your Wheels
You can use a skate tool or the axles of your trucks to pop them in place, make sure you put them in all the way, they shouldn’t stick out. You should also use spacers to protect your bearings from getting crushed when you tighten the axle nut.
Place the first bearing in your wheel, you can just push them in a little using your hands
- Place the wheel and bearing on your truck’s axle and apply some pressure. You might need to use some force but don’t overdo it.
- Put in the spacer, just slide it on the axle.
- Add the second bearing, apply some pressure with your thumbs.
- Remove the wheel, turn it around and put it on the axle again. Apply pressure until the bearing pops in.
If you’re having a hard time getting the bearing in, use some silicon lube or oil on the inside of your wheel (core) an upper side of your bearings.


Step 5 – Attach the Wheels
Really easy, the only thing you need to remember is not to screw the truck’s axle nuts too tight. It could destroy your bearings. Don’t forget to attach the speed washers.
Tools you need: A skate tool or a 1/2″ socket/wrench
- Put the washers on your truck’s axle
- Attach the wheel, the spacers might move around a little and block the end of the axle. Just wiggle it a bit and the wheel should fall into place.
- Put the washer on the outside
- Attach the truck’s nut and tighten it. Not too much, your wheels should still be able to spin.

Pro Tip: Use A Skate Tool
I wrote this guide a while ago and now have assembled many skateboards over the years. To save yourself a lot of trouble and speeding up the process, consider a skate tool. The Silver Skate Tool is perfect for assembling a complete skateboard. Check out my recommended skate tools (spoiler: I recommend the Silver Skate tool).


I’m an aged skateboarder and still shred responsibly. Started skateboarding 25 years ago, peaked in the 2000’s, and still ride to this day. I am a total geek when it comes to skateboard gear, love test to stuff and share my findings.